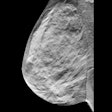
For the breast healthcare facility, making the leap (some would call it more of a catapult) to full-field digital mammography (FFDM) means many changes. Of course, the better prepared you are for these changes, the easier the transition will be.
For patients, the information they glean about FFDM would seem to indicate big changes for them as well. Patients are usually excited to find out that they are getting a digital mammogram. But during the exam, when the radiologic technologist (RT) begins to compress the breast tissue, reality sets in: "I thought you didn't have to compress anymore?" the patient inquires.
In truth, little has changed for the patient in terms of the actual exam procedure, although there are other benefits, such as less time spent in the screening room.
But for the RTs performing the exam, FFDM does require some adjustment to their positioning technique. This article highlights some of the main differences between scanning patients on a digital unit and an analog one, and how to make the most of this new technology.
Detectors
In the analog world, the U.S. Food and Drug Administration (FDA) required all mammography machines to have two bucky sizes, but with digital there's only one detector, and the size will vary by vendor and model. Regardless of which model unit you have, you will still need to make the same adjustments.
Imaging a larger patient on a small detector will require additional images to completely visualize all of the breast tissue. Imaging small women on a large detector may require changes to the mediolateral oblique (MLO) angulation to fit them into the machine.
Machines with a larger detector will usually have two sizes of compression paddles, so use the size that best fits the patient. This will prevent overpixilation of the images, allows for easier patient positioning, and will help with file size and storage.
Patient approach
Patient approach to the machine is critical to obtaining a good image. When performing the craniocaudal (CC) view, have the patient approach the machine, stopping just in front of the receptor. Her ribs should not be in contact with the machine at this point. Have the patient tip forward, slightly bending at the waist, which means her breast will be placed onto the receptor prior to her ribs making contact with the front of the receptor. This will result in better visualization of the posterior chest wall breast tissue.
It's very important to use two hands to pull her breast onto the receptor. You want to lift, pull, and place -- don't be a one-handed plopper! Try to get the patient to relax as you elevate the breast and pull it. I've found that if I ask the woman to slouch, instead of saying "relax," she responds better.
Centering
Centering is very important to the digital image; make sure that tissue on the edges of the breast is not lost. Use the different paddles to your advantage here. Because FFDM allows for visualization of the skin line, a larger paddle may be required for patients on whom an 18 x 24 paddle was used for an analog exam. This would apply to patients who were a close fit before.
When performing the MLO view, the receptor must be aligned with the anterior superior iliac spine (ASIS). This will place the posterior tissue and inframammary fold (IMF) in front of the receptor, making it easier to obtain in the image.
Here's a tip: Place a piece of tape on the floor to mark the center of the unit. Align the foot of the affected side with the tape. This will align the patient correctly for the CC and MLO views. For example, for a right MLO, align the patient's right foot on the tape.
You will not want to drop the patient's arm off the back of the receptor, instead just place it across the top of the receptor. This will allow you to obtain the superior breast tissue and increase relaxation of the pectoral muscle.
IMF
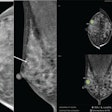
You may feel like you are not getting the IMF to open as well on digital. Because of the visualized skin line, you are getting a view that was not previously seen without a hot light. On analog, we often thought it was open when it was not. Look closely at this area on your analog image. Is there a black triangular-shaped area in the IMF? If so, then the IMF was not open. Digital simply allows us to see this area better.
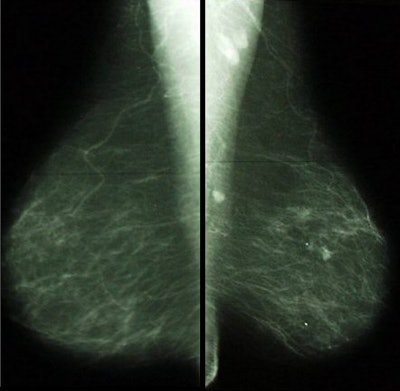 |
| Note the black triangular area in the region of the IMF on the left MLO view. The IMF is not open on this image. With digital technology we can see the skin line in this area and it is more obvious. Images courtesy of Tammy Coryell. |
Often the cause of a poor IMF is folds between the patient's lateral/posterior breast tissue and the receptor. Carefully pull the breast onto the receptor while making the skin taut in this area. Finger sweep the IMF prior to final compression to ensure that it is open.
Skin folds will be enhanced with digital imaging (note that digital does not create skin folds). Reduce or eliminate as many as you can without sacrificing breast tissue; tissue should never be excluded to eliminate a fold. If that's not possible, you must take an additional image.
You may notice an increase in the appearance of skin folds on the lateral aspect of the CC view. This is because the upper outer quadrant of the breast is being visualized, which is a good thing. It was probably on your prior analog images, but it was difficult to see without a hot light.
The CC view may also demonstrate what appears to be a skin fold in the medial aspect of the breast. This is normal and is caused by the digital algorithm applied to the thicker skin in this area.
To determine if another image needs to be taken, look for image blur in the skin fold region. If there is blurring, another image should be taken. Also look for deep crevices that may cause you to miss microcalcifications or small masses. If you can't adequately visualize the tissue at the fold, take another image.
Skin folds can be prevented during positioning. For skin folds in the axilla, try to smooth this area as much as possible during early positioning. Stretch the axillary area away from the chest wall as compression is applied. If the fold remains after compression is applied, gently pull the skin above the paddle to remove the fold. Just before the exposure, you may want to slightly raise the elbow to pull the tissue upward.
For skin folds in the anterior portion of the breast, carefully slide your hand out when placing the breast onto the receptor. Firmly secure the breast until the paddle is able to hold it in place. Timing of the release is critical.
Adapting to FFDM
Beyond positioning, switching to digital will require some overall changes at your facility. These include:
Scheduling
The time for a digital exam is generally much faster than an analog one (times vary, but a digital exam should take half as long as an analog one), so that means finding a balance between managing this new, speedier schedule while still providing a high level and quality of care.
Workflow
In general, you can't follow an analog workflow in the digital world! Most sites do not have the same number of digital rooms as they had with analog. In addition, techs will have to share rooms. How you manage workflow will depend on factors unique to your site.
One option is RT aides for supporting and managing the workflow. Aides can perform nontechnical tasks, such as getting the patient ready for the exam. Hiring aides will require a financial investment, but it can be cost-effective in the long term because it allows the technologist to be more efficient and achieve higher patient throughput.
Review of prior films
If the priors have not been digitized, then switching back and forth between the viewbox and the monitor can be challenging. Be sure to carefully review the digital images to ensure that they are comparable to the film-based exam in terms of the amount of tissue obtained.
Quality control
QC doesn't go away with FFDM, it simply changes. Processor QC is no longer performed, but there are tests on the monitors, printers, and detectors that are new to the digital world. QC is still a very important part of the mammographic process, and if the entire imaging chain is not performing correctly, cancer can be missed.
|
Tips for FFDM positioning
|
As with all new ventures, digital mammography has a learning curve, but with change comes progress. FFDM is raising the bar in breast cancer imaging so let's embrace it.
By Tammy Coryell, R.T.
AuntMinnie.com contributing writer
October 10, 2007
Tammy Coryell, R.T. (R)(M) has been a mammographer for more than 20 years. She is co-president and founder of Mammography Impact Consultants of St. Peters, MO. She served as a clinical educator for BioLucent of Aliso Viejo, CA, and is now a clinical applications specialist for Hologic of Bedford, MA.
Related Reading
Hologic completes BioLucent purchase, September 20, 2007
Fewer views, faster film abates radiation dose in implant mammography, May 8, 2007
Breast implants require deft maneuvering for maximum mammo quality, October 11, 2006
Enhancing breast positioning, tissue acquisition with cushioning pad, June 27, 2006
Copyright © 2007 AuntMinnie.com


