The year was 1992 and there was no shortage of headlining events in politics (Bill Clinton elected to his first presidential term), sports (the Washington Redskins won the Super Bowl), and the workplace (Microsoft Windows 3.1 debuted). On the women's healthcare front, 1992 saw the ban on silicone breast implants.
Things started to go awry for the implant industry when multiple reports of leaks and ruptures surfaced, prompting the U.S. Food and Drug Administration (FDA) to make this decision. These implant breaks lead to migrating silicone, subsequently promoting a woman's immune system to attack healthy tissue.
The FDA called an immediate halt to breast enhancement with silicone implants (the ban did not apply to saline-filled breast implants). Ultimately, the FDA backed off and stated that only women having post mastectomy reconstructive surgery could have silicone implants.
Fast forward to 2006 and silicone implants seem to be making a comeback. In 2005, the FDA offered one manufacturer a conditional approval for the reintroduction of silicone implants. Others have filed applications with the FDA for "new and improved" implants and are waiting to hear if the federal agency will reconsider.
And the ban certainly hasn't stopped women from having breast implants. According to the American Society of Plastic Surgeons, more than a quarter of a million women in the U.S. underwent breast augmentation in 2005.
As the population ages, many women with implants will reach the right age for screening mammography. Implants have always presented a challenge to mammography technologists. What follows are some tips on how to work with breast implants for breast screening.
Mammography: CC view
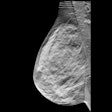
Displacing the implant is usually easiest if you ask the patient to bend forward at the waist. Gravity will allow the breast tissue to fall forward while the implant will remain closer to the chest wall, particularly if it's located subpectorally.
The implant can be pushed back with two techniques. One option is to start at the nipple and "walk" your fingers back until you feel the implant move back. The second is to start at the chest wall and move toward the nipple while applying pressure from above and below until you feel the implant move back. Some implants will be much easier to feel than others.
 |
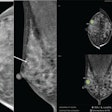
| Above, left CC ID view. Below, left CC view with implant. Images courtesy of Tammy Coryell. |
 |
Once you are satisfied that the implant has been pushed back, keep your fingers in place so that it will not slip. Have the patient stand up and approach the machine. I like to have them place their opposite hand under their breast against their ribs so that it will keep them from getting too close to the bucky. This will allow the implant to stay displaced as I compress. You should see the implant bulging up.
As you apply compression, keep the implant from slipping forward. Also keep one hand on the patient's back so that she doesn't pull away.
If the amount of tissue on the displacement view is not adequate to cover the photocell detector, use a manual technique.
Mammography: MLO view
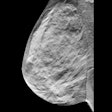
To displace the implant for the MLO view, have the patient bend forward at the waist, pull the axillary and upper outer quadrant tissue forward, and then displace the implant. Getting the axilla and upper outer quadrant (UOQ) will be difficult if you start by displacing the implant around the mound of the breast.
Once the implant has been pushed back, keep your fingers in place so that it will not slip. Have the patient approach the machine and place her hand on the bar, with the corner of the bucky in the posterior aspect of her armpit.
 |
| Above, right MLO ID view. Below, right MLO view with implant. Images courtesy of Tammy Coryell. |
 |
Place your hand at the edge of the bucky so that the patient's ribs don't make contact with the bucky, as that will make it difficult to push the implant back adequately. Some of the implant should be between the bucky and the patient if you feel from the posterior edge. As you bring the compression down, ensure that the implant does not slide forward.
The spatula is one of the greatest tools for implant displacement. After displacing the implant, place the edge of the spatula against the displaced implant and flip it up vertically. The compression will come down in front of the spatula and hold the breast in place. Because the implant is behind the compression paddle, it will not appear in the image.
Implants and other modalities
Implants interfere with tissue visualization so there will always be some tissue that, even with the displacement (ID) views, will be impossible to see on mammography. Other modalities allow for better visualization.
MRI
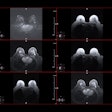
Mammography is still the best tool for breast cancer screening, and there are currently no recommendations for using MRI as a cancer screening tool in women with implants, but it can be helpful in selected cases. It's an excellent tool for imaging the augmented breast, including the implant itself and the breast tissue surrounding it.
 |
| Representative MR image of 220-mL single-lumen silicone gel-filled implant placed December 20, 1982, shows presence of multiple-layered wavy lines representing collapsed implant shell surrounded by silicone gel (i.e., linguine or wavy-line appearance). Brown SL, Middleton MS, Berg WA, Soo MS, Pennello G, "Prevalence of Rupture of Silicone Gel Breast Implants Revealed on MR Imaging in a Population of Women in Birmingham, Alabama" (American Journal of Roentgenology, 2000;175:1057-1064). |
Analog mammography cannot penetrate silicone or saline implants well enough to image the overlying or underlying breast tissue. Implants can obscure some of the breast tissue on mammography, making abnormalities or signs of breast cancer more difficult to see. MRI imaging does not have these limitations. It's also well-suited for demonstrating implant leakage or rupture, and for imaging breast tissue that is compressed by the implant. There are some patient limitations, such as claustrophobia or the inability to lie facedown on the exam table.
Digital mammography
Digital mammography is an excellent tool for imaging the augmented breast because its capacity for tissue equalization allows the skin line, which often appears burned out on an analog exam, to be seen. Digital provides better visualization of the tissue surrounding the implant and, in some cases, will allow penetration of the tissue behind the implant.
Ultrasound
Ultrasound can be used as a screening tool to detect implant rupture or leaks, but the sensitivity and specificity of ultrasound is lower than MRI. Of course, ultrasound is less expensive than MRI and has fewer patient limitations.
 |
| Sonogram of multiple discontinuous linear echoes (stepladder signs). Cursors denote anterior and posterior implant margins defined by fibrous capsule. Multiple parallel lines (arrows) represent floating envelope of this ruptured implant. Venta LS, CG Salomon CG, Flisa ME, Venta ER, Izquierdo R, Angelats J, "Sonographic signs of breast implant rupture" (AJR, 1996;166:1413-1419). |
Final tips
Many factors can contribute to the success of the mammogram, such as the location of the implant (subpectoral or subglandular), the amount of tissue surrounding the implant, the pliability of the tissue and the implant, and the patient's cooperation. If the implant is encapsulated, it will be much harder to adequately position for the ID views.
When imaging a patient with breast implants, you will need to do two sets of images: a full set and an implant displacement set. The full set will allow you to see the integrity of the implant as well as the deep chest wall tissue at the lateral and medial aspect of the breast. The displacement set will allow you to see the tissue that may be hidden by the implant, and will allow you to compress the tissue better.
You will need to take care with the amount of compression that is applied to the full implant image. There is a difference in thickness between a natural breast and an implant so apply just enough compression to stabilize the breast and prevent motion. Applying too much compression to the implant can increase the risk of rupture.
By Tammy Coryell, R.T. (R)(M)
AuntMinnie.com contributing writer
October 11, 2006
Tammy Coryell, R.T. (R)(M), is a mammography specialist with Mammography Impact Consultants in St. Peters, MO, and a clinical educator with BioLucent of Aliso Viejo, CA. She is also a mammography technologist at St. John's Breast Center in Springfield, MO.
Related Reading
Enhancing breast positioning, tissue acquisition with cushioning pad, June 27, 2006
Reports to FDA allege damage to breast implants during screening, June 15, 2004
Implants may interfere with mammograms but tumors found at similar stages, January 28, 2004
Augmented breast imaging presents new challenges for mammographers, November 17, 2000
Copyright © 2006 AuntMinnie.com


