AuntMinnie.com presents the third in a four-part series on overcoming work-related musculoskeletal issues for sonographers by Doug Wuebben, a cardiac sonographer, along with Mark Roozen, strength coach for the National Football League's (NFL) Cleveland Browns, and Joel Raether, strength coach for the National Lacrosse League's (NLL) Colorado Mammoth. Parts 1 and 2 can be found here and here.
As highlighted in part 1 of our Scanning in Pain series, the combination of proper movement patterns, ergonomic aids, strength training, and flexibility improvements can enable sonographers to attenuate injury and improve career longevity.
In part 2, we began our discussion of the 10 sonography sins that can lead to chronic injury as defined by Carolyn Coffin, of consulting firm Sound Ergonomics, in an April 6, 2010, article on AdvanceWeb. In combination with the ergonomics advice from Sound Ergonomics, we shared some quick and simple movements that can add longevity and pain-free scanning to your career. We'll now continue with sin No. 3.
Sin No. 3: Excessive neck flexion and extension
Ergonomic aid: Position monitor with the top of the screen at eye level.
Performance aid: Flexion is a position that is made possible by a joint angle decreasing. The bones and connective tissue and muscular systems work together to move the joint into a "flexed" position. For example, the trunk may be flexed toward the legs or the neck to the chest -- think taking your chin and touching your chest.
The opposite term is extension, or straightening. Flexion decreases the angle between the bones of the limb at a joint, and extension increases it. A simple way to increase stability and strength in the neck is to perform a few basic isometric exercises, which involve muscular contraction against resistance when the length of the muscle remains the same. In other words, you make the muscles work, but nothing moves.
Strength movements
The following are isometric exercises that strengthen the head and neck extensor muscles:
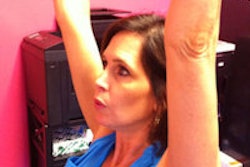
- For flexion: Place your hands on the back of your neck. Keep your neck straight and attempt to push your head backward while resisting the movement with your hands. Hold for eight to 10 seconds and then relax. Repeat for a second time (figure 1).
- For extension: Place your hands on the top of your forehead. Keep your neck straight and attempt to push your head forward while resisting the movement with your hands. Hold for eight to 10 seconds and then relax. Repeat for a second time (figure 2).
 |
| Figure 1 (left) and figure 2 (right). All images courtesy of Mark Roozen. |
As you improve, you can increase the intensity of the exercise by doing the exercise longer or adding a third set, building up to four.
General note: If you have any type of injury, neck pain, or joint problems, consult with a physician before doing these or any other type of neck exercises.
Stretching movements
- Chin tuck: Pull your chin downward toward your sternum, and lightly apply your hand to the back of your head and pull forward. This should apply a light stretch to the back of the neck. Hold for 10 to 20 seconds and repeat one to two times (figure 3).
- Lateral stretches: With your chin forward, bend your neck to the side as if trying to put your ear on your shoulder. Apply a gentle stretch, with the hand pulling your head toward your shoulder. Hold for 10 to 20 seconds and repeat one to two times. Perform on both sides (figure 4).
 |
| Figure 3 (left) and figure 4 (right). |
Sin No. 4: Twisting your neck
Ergonomic aid: Position the monitor directly in front of you.
Performance aid: Twisting the neck can cause tightness in the shoulders and up into the traps, the muscles from the shoulders, up the neck to the skull. Lateral flexion is sideways movement of the spine, as occurs when the neck moves toward the shoulder. By taking the time to do a few simple movements, the ability to maintain mobility and strength in the neck can yield huge benefits when the need to twist the neck arises.
Strength movements
- Lateral flexion: Place your hand on the side of your head and maintain, keeping your head in a vertical, neutral position. Press your head into the hand and hold for eight to 10 seconds. Repeat this two times with each side (figure 5).
 |
| Figure 5. |
Stretching movements
- Stretching can be very useful for people who suffer from tight, aching muscles in the upper back and neck, such as when you spend long periods of time in front of the computer. A lateral flexion neck stretch can help with this problem.
- To do this stretch, look straight ahead and do not let your chin drop. Move your ear toward your shoulder; do not let the shoulder rise to the ear. Hold for 10 to 30 seconds and repeat on the other side. To increase the intensity, further the stretch by using the hand opposite of the head movement to apply light pressure to the side of the head.
Sin No. 5: Twisting your trunk
Ergonomic aid: Position all equipment and the patient to minimize your need to twist.
Performance aid: Our "trunk," or in fitness circles now called the "core," is where all movement in your body begins. Trunk/core exercises should be a major part of an exercise program. To assist in allowing the body to twist and rotate with no problems, it's vital to get your trunk/core muscles in better shape. To do this, we want to make sure we understand what the trunk/core is, and then we'll show how to strengthen it and increase range of motion through stretching.
Your body's core is referred to as the structure around your trunk and pelvis. By building a strong trunk, we increase protection around the areas and offer stronger "bracing" for your back. We also increase control of movement, get a more stable center of gravity, and build a more stable platform for movement when we have to exert additional force, such as helping to move a patient.
When you have good core strength and stability, the muscles in your pelvis, lower back, hips, and abdomen work together to allow movement in multiple planes and with multiple loads. An in-shape trunk/core gives support to the spine for almost all movements and activities. Without proper strength, the trunk/core can lead to bad posture, which, in turn, can lead to aches and pains or worse ... injuries.
Strength movements
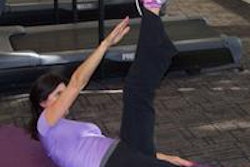
The band rotation exercise will develop strength, endurance, and power in the core. For equipment, you'll need some tubing, or you can also use a cable machine found in most gyms (as shown in the photo). The body movement is the same (figures 7A and 7B).
To start, hook the tubing on a secure attachment and grab the handles of the tubing at about shoulder level. Your feet should be approximately shoulder width apart. For more stability, you can take a slightly wider stance. Keep the knees bent and torso upright.
Step away from the tubing attachment to create tension. Remember, the farther away you stand, the more tension will be on the band, and the harder the exercise will become.
To start the exercise, rotate your shoulders and hips in the direction opposite of the tubing attachment, pulling the arms across the front of your body. Do not keep your heels on the ground during rotation; doing so can cause shear forces in the back. We want to strengthen the muscles in the trunk/core, not cause injury to the spine.
Continue to rotate at a controlled speed until the shoulders are completely rotated in the opposite direction, and your hands are on the opposite side of your body. Return to the starting position and repeat for eight to 12 repetitions. Turn around, switch to your opposite side, and repeat for the desired repetitions. Start with one set and build to two to three sets.
 |
| Figure 7A. |
 |
| Figure 7B. |
Stretching movements
 Figure 8.
The back rotation stretch can be done in a chair. First, sit back in a chair and face forward. Cross your right leg over your left, and put your left hand on your right knee. Now slowly and gently pull toward your left side with the left hand, while slowly turning your head and shoulders to the right.
Keep rotating as far as possible, with the goal of being able to turn until you can see over your right shoulder. You will feel a stretch in your lower back and through the muscles along the side of the body. Hold for 10 to 30 seconds. Relax and repeat on the other side. Start with one set and build to three times on each side (figure 8).
Sin No. 6: Bending your trunk
Ergonomic aid: Adjust the height of the exam table or stand to avoid bending over.
Performance aid: Just like flexion and extension of the neck, moving the upper body forward or backward creates flexion or extension in the upper body. In most cases, we are talking about bending forward: reaching over something or someone to get something or get into a better position to do a task.
Toned and flexible muscles are the spine's best defense against injury. Performing exercises to strengthen the muscles that support the spine can prevent, reduce, and even eliminate back pain.
Strong abdominal muscles (stomach muscles) are just as important to develop as strong back muscles. Having a balance of strong abs and a strong back is vital for supporting the lower back and preventing lower back pain. Even having strong legs might assist in preventing back injuries, in the case of lifting and other movements, where the load can be carried through other parts of the body and not just the back.
Flexibility is also important when we are looking at problems from bending of the trunk. Tight muscles can cause alignment problems and back pain. Stretching exercises lengthen shortened muscles and help the body maintain proper position, which, in turn, helps to relieve back pain. Tight muscles in the back, buttocks, hamstrings (back of thigh muscles), or quadriceps (front of thigh muscles) can affect alignment.
Strength movements
The reverse crunch is a lower abdominal exercise that is done on the floor. Lie flat on your back with your feet in the air. Bend your knees to 90°. Place both hands under your buttocks for support and make sure your lower back remains flat on the floor (figure 9A). Tightening your lower abdomen, try to lift your buttocks a few inches off your hands. Hold for a moment and lower back down. Start by doing five to 10 repetitions.
Build up from one set to two to three sets. You can also vary the intensity of the exercise by making it harder -- placing your hands on your stomach or the floor (figure 9B) -- or you can make it easier by lifting one leg at a time (figure 9C).
 |
| Figure 9A (left) and figure 9B (right). |
 |
| Figure 9C. |
The alternating Superman exercise is great for the lower back, and it can also work other areas of the body from the legs to the shoulders and arms. To start, lie face down on a mat on the floor, with your arms stretched above your head (like Superman flying). As you raise your right arm, also lift your left leg about five to six inches off the ground (or as far as you comfortably can). Hold this position for three to five seconds and then relax.
Repeat with the opposite arm and leg. Again, start with one set of five to 10 reps per arm and leg. As you progress, you can add additional sets to the exercise, building to two to three sets (figure 10).
 |
| Figure 10. |
In our final edition of Scanning in Pain, we'll cover the remaining sonography sins.
Doug Wuebben is a registered cardiac sonographer who performs adult and pediatric echocardiograms in South Dakota and can be reached at [email protected]. Mark Roozen is a strength coach with the Cleveland Browns and also the owner and president of Performance Edge Training Systems (PETS). He can be reached at [email protected].