This article continues our series of white papers on radiologic patient positioning techniques for x-ray examinations. Appearing each month on AuntMinnie.com, the series will explore each of the major modalities. If you'd like to comment on or contribute to this series, please e-mail [email protected].
The dorsal decubitus (right or left) position is a good alternative to obtaining a lateral decubitus or erect abdominal x-ray image when a patient cannot stand or lie on their side. It can provide information regarding pneumoperitoneum and air fluid levels in cases of suspected acute abdominal trauma. The examination can be performed at the patient’s location, such as the ICU, with a mobile x-ray unit. This view can also help to evaluate an incisional hernia or the diameter of a calcified aortic aneurysm.
 |
| Reprinted from Merrill’s Atlas of Radiographic Positions and Radiologic Procedures, 9th edition, Ballinger and Frank, page 50 (figure 16-19), copyright 1999 Mosby, with permission from Elsevier Science. |
Position of the patient
Place the patient in the supine position on a radiolucent pad with the right or left side against the grid device. Elevate their arms and place them along side their head or across the upper chest. Placing a support under the knee helps to relieve strain when a patient is in the supine position.
Position of abdomen
 |
Film holder placement
Adjust the height of the vertical grid so the long axis of the cassette is centered to the mid-coronal plane. A 14 x 17 inch (35 x 43 cm) film or image receptor (IR) should be positioned crosswise.
Central ray
The central ray (CR) should be horizontal and perpendicular to the center of the cassette and directed to the mid-coronal plane, 2 inches (5 cm) above the level of the iliac crests.
Collimation
Collimation is adjusted to center mid-coronal plane of the patient to the IR margins, making sure that upper and lower soft tissue borders the abdomen are included. Close collimation is important because of the increased scatter from a high kVp and the need for soft tissue visibility.
Imaging technique
- Moving or stationary grid
- 70-80 kVp range
- mAs 60
- Sk 1040
- SID minimum of 40 inches (100 cm)
- cm 30
Evaluation criteria for a good dorsal decubitus projection
 |
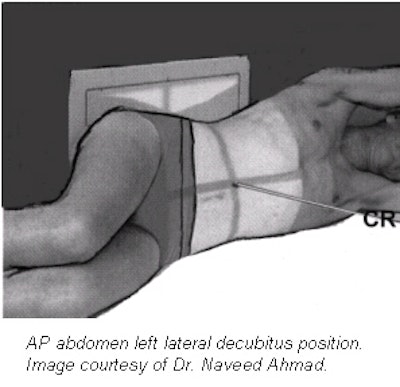
Left lateral decubitus AP abdominal exam
The left lateral decubitus position is usually performed on patients who are too ill to stand and are lying on a transportation cart. Special care must be exercised to ensure that patient does not fall off the cart. Lock all the wheels securely in position. Remove any opaque objects in the clothing or gown that can cause artifacts in the area to be x-rayed. Use gonadal shielding on males; the upper edge of the shield should not be above the pubic symphysis. In female patients, an ovarian shield can obscure pelvic anatomy, so one should not be used unless the physician requests it.
Position of the patient
- Before films are obtained, the patient should be in the left side down position for at least 10 minutes. This position allows air/fluid to rise out of the lesser sac of the peritoneal cavity (where it may be located) and accumulate beneath the iliac crest or over the right margin of the liver.
- The knees are slightly flexed and superimposed to provide stabilization.
- The arms are elevated and placed along side of the patient’s head. The scapulae should lie in the same vertical plane.
 |
| Reprinted from Merrill’s Atlas of Radiographic Positions and Radiologic Procedures, 9th edition, Ballinger and Frank, page 44 (figure 16-11), copyright 1999 Mosby, with permission from Elsevier Science. |
Position of abdomen
- Adjust the patient to ensure that a true lateral position is obtained with no rotation of pelvis or shoulders.
- The most commonly used abdominal landmark is the iliac crest, which corresponds to the level of the mid-abdomen and is at the L4-L5 vertebral inter-space level.
- The cassette or IR is centered to the iliac crest and the lower abdomen is generally included on the lower margin of the cassette. In some cases, a slightly higher centering point may be needed to ensure that the diaphragm is included in the image.
- The exposure is made at the end of expiration and should begin 1-2 seconds after respiration is suspended. Ask the patient to take a deep breath, let it all their breath out, and to hold their position while not inhaling. This moves the diaphragm to a superior position that results in better visualization of the abdominal viscera.
Film holder placement
The long axis of the film should be parallel with the long axis of the body and film is centered to the CR. A 14 x 17 inch (35 x 43 cm) film or IR should be positioned lengthwise, with its lower edge at the symphysis pubis. Crosswise cassette placement is appropriate if the patient is very large. The proximal margin of the cassette should be approximately at the level of the axilla.
Central ray
The CR is directed to the midpoint of the mid-sagittal plane at the level of the iliac crest, in some patients a slightly higher CR, 2 inches (5 cm) above the iliac crest may be needed to include the diaphragms. The CR is directed perpendicular to the film.
Collimation
Collimation is adjusted to center mid-sagittal plane of the patient to the IR margins, making sure that upper side of the abdomen is clearly included.
Imaging technique
- Moving or stationary grid
- 70-80 kVp range
- mAs 30
- Sk 396
- cm 21
Evaluation criteria for a good left lateral decubitus projection
- Proper alignment -- the vertebral column should be in the midline position. The ribs, pelvis, and hips should be equidistant to the edge of the radiograph
- Proper exposure -- slightly less overall density than the supine abdomen projection. Exposure should be sufficient to visualize spine, ribs, and soft tissues.
- No motion -- the diaphragm should appear sharp bilaterally.
- No rotation -- spinous processes in the center of the vertebral column and symmetric ilial wings.
- Proper collimation and CR -- The image should include the area from the upper border of the pubic symphysis to the diaphragm and upper side of the abdomen should be clearly included.
- Appropriate markers should be placed indicating the position.
Supplemental projections of the abdomen
When a patient with an acute abdominal trauma is evaluated, the following radiographic projections may be ordered.
- AP supine radiograph and a horizontal beam radiograph: It is critical that a minimum of these two radiographs be obtained for the demonstration of both free intraperitoneal air (pneumoperitoneum) and air fluid levels. Failure to obtain these projections will result in substantial errors in diagnosis. The upright film centered at the diaphragm is the "best" horizontal beam film in that it will show the smallest amount of free intraperitoneal air.
- Lateral decubitus position and cross table lateral films: If the patient is unable to stand, a film of the patient in the lateral decubitus position should be obtained with a horizontal beam. This method results in less penetration of the abdominal viscera but good visualization of small amounts of extra alimentary gas. Alternatively, this information can be obtained on a film of the abdomen taken with the patient in the dorsal decubitus position. This position is usually adequate in providing the required image and should be used in patients where an upright position film is impractical.
- Posteroanterior chest films: In a patient with abdominal pain, a PA chest film with the patient in the upright position is useful for two reasons: it facilitates the detection of small amounts of free intraperitoneal air, and it may demonstrate unsuspected thoracic disease that is causing abdominal pain. PA views are more sensitive for detecting pneumoperitoneum than abdominal films taken with the patient in an erect position. This difference in sensitivity occurs because the x-ray beam is centered at the iliac crest on abdominal films, so that it penetrates air beneath the diaphragm obliquely rather than tangentially. In addition, the exposure technique that is required to penetrate the abdomen obscures small collections of free intraperitoneal air.
- Perforation series: This term is sometimes used to indicate views of the abdomen including upright, supine, lateral decubitus, and chest PA upright films. The objective of this series is to increase the sensitivity for detection of free intraperitoneal air in case of visceral perforation.
- Depending on the clinical setting, additional projections such as prone, oblique, lateral, or coned views may be obtained for better localization of lesions, calcifications, or herniations.
AuntMinnie.com contributing writer
February 28, 2002
Related Reading
AP abdominal projection x-ray positioning techniques, January 16, 2002
Tips and techniques for decubitus and oblique chest x-rays, December 21, 2001
Mastering AP and lateral positioning for chest x-ray, November 20, 2001
Good positioning is key to PA chest x-ray exams, October 19, 2001
Copyright © 2002 AuntMinnie.com